Tuesday, October 1, 2013

SharePoint 2010 Custom Development Best Practices

If you are new to SharePoint 2010 development, building custom solutions based on the SharePoint 2010 framework is never easy. Sometimes list of types of custom components you can build on top of SharePoint 2010 Foundation framework is overwhelming. For the novice or even for the experienced SharePoint developers, it would be easy to get lost into specifics of the SharePoint 2010 development. Every kind of custom SharePoint components like web parts, visual web parts, application pages, site pages, master pages, page layouts, content types, list definition, site definitions, workflows, event receivers, lists, content types, field types, etc. brings their own special challenge.

1.    Don’t ever change the files in the out of the box SharePoint Root (14-Hive) directory. 
2.    Never build your SharePoint development environment on the host machine. Use the Virtual
     Machine   instead. Virtualized environment promotes portability, playground as sandbox, 
     and allows quick and easy way to snapshot the development environments. 
3.    Leverage WSPs (solutions and feature framework) while deploying and packaging code from development to staging to production environment. 
4.    Make sure solutions have proper consistent naming convention e.g. OrganizationName.BusinessSolution. 
5.    Make sure solutions have proper feature name and description. Feature name and description would be visible on the site collection and site features page. 
6.    Make sure custom code is compiled and packaged in release mode. 
7.    Use SPUtility, SPUrlUtility, and HttpUtility if you can. e.g. Use SPEncode to encode the HTML and URL encoding. 
8.    Since URLs can change between different environments, use site.serverrelativeurl instead of site.url to build the URL in code. 
9.    Don’t forget to dispose the newly created SPWeb and SPSite objects. If you create an object using “new”, you must dispose it. (e.g. SPSite site = new SPSite(url) or SPWeb web = site.OpenWeb()). Although SPWeb and SPSite objects use minimal managed memory, it allocates substantial unmanaged memory. You must free up unmanaged memory allocated during creation of SPWeb or SPSite objects by disposing the objects. Best practice is to instantiate objects with “using” keyword in C#.  (e.g. using (SPSite spSite = new SPSite(url))).  Additionally, always run solution against SPDisposeCheck utility to ensure disposing all the objects properly before production deployment. (http://code.msdn.microsoft.com/SPDisposeCheck) 
10.  Don’t dispose the SPContext.Current.Site or SPContext.Current.Web object. It will be disposed automatically by the runtime. e.g. Do not use “using” keyword with the object referenced through SPContext  (e.g. don’t use using(SPWeb spWeb = SPContext.Current.Web)) 
11.  Don’t use SPContext.Current.Site or SPContext.Current.Web objects in the Feature Receiver to access current instance of SPWeb or SPSite . If you ever try to activate/deactivate features using PowerShell, SPContext would fail because it’s available only in the browser context. Instead use properties.Feature.Parent to access current instance of SPWeb or SPSite object. For Site collection level feature, it would return SPSite and for web level feature, it would return SPWeb object. (e.g. use using (SPWeb spWeb = (properties.Feature.Parent as SPWeb))) 
12.  Plan to install SharePoint Manager 2010 from the codeplex. It is a SharePoint object model explorer and enables you to browse every site properties on the local farm by browsing through SharePoint Internals.(http://spm.codeplex.com/) 
13.  Use SharePoint Developer Dashboard to Investigate the Page Performance bottlenecks. It gives detailed information on resource usage, performance, user interactions and error trapping. Use SPMonitoredScope code block to generate the custom logged counters on the Developer Dashboard. Please note that you can enable the Developer Dashboard at the farm level and never enable it in production environment. 
14.  Use SPGridView instead of standard ASP.NET Gridview to inherit the SharePoint CSS, Look and Feel, and Column filtering mechanism. On other side, Use standard ASP.NET Gridview instead of SPGridView to full control over the tabular design and functionality. 
15.  Use the List Event Receivers to execute the code immediately. Workflows can perform similar function but it will run as a timer job which may delay the code execution. 
16.  Use SharePoint Site Property Bag to classify the sites and persist site level metadata. You can either use SPWeb.Properties (Microsoft.SharePoint.Utilities.SPPropertyBag Object) or SPWeb.AllProperties (System.Collections.Hashtable Object) or Site      Property Bag Configuration Tool – http://pbs2010.codeplex.com/. SPWeb.Properties considered as legacy approach since it stores key and value in lowercase. SPWeb.AllProperties keeps casing of key and value intact. If you don’t care about the persisting case, plan to use older method SPWeb.Properties instead of newer method SPWeb.AllProperties. Here is the reason why – http://www.novolocus.com/2010/12/22/stupid-spweb-properties/ 
17.  Don’t build State Workflows in the SharePoint 2010 using Visual Studio 2010.  State workflows may NOT be upgradable because they are not available in the .NET 4.0 which might be foundation framework for the next version of SharePoint. 
18.  Use field controls on the WCM sites instead of web parts because you won’t have page history with web parts. 
19.  For the list data access using server side object model, Use LINQ if you can, CAML if you must. Another argument is – Use CAML for fastest performance and LINQ for object oriented development. 
20.  Do not instantiate SPWeb, SPSite, SPList, or SPListItem objects within a list event receiver. It would cause significant performance overhead due to additional round trips to the database and fail other registered event receivers during subsequence update calls. Instead retrieve the SPWeb or SPListItem from SPItemEventProperties. (e.g. use SPWeb web = properties.OpenWeb() or SPListItem item = properties.ListItem) 
21.  Do not use SPList.Items while accessing list items using server side object model and try to avoid SPList.Items in a loop expression. SPList.Items iterates through all list items from all subfolders and all fields in the list item. To retrieve the list items, instead use SPList.GetItems(SPQuery query). 
22.  Avoid deploying DLLs to the GAC (this has risks because of security override), instead deploy it to the web application IIS bin directory and use custom CAS policies. 
23.  Target farm level solutions to the specific web application instead of deploying to all web applications unless you are deploying new feature to all the applications in the farm. This way custom feature for the specific web application won’t available on site collection features page or site features page on all the web applications in the farm. 
24.  Build Sandboxed solutions over farm level solutions for site collection specific custom solutions to balance business agility and IT stability. Understand the limitations of the sandbox solutions. Create site collection resource quota templates in the central administration. Another argument against sandbox solutions is it has resource quota points estimation issues for heavily collaborated sites. 
25.  Plan to disable the SharePoint Designer at the farm level and enable at the web application and site collection level as needed. 
26.  Instead of Custom Site Definition, use Web Template or Feature Stapling capabilities to add custom features on the out of the box site definition. I would also prefer Custom Coded Site Templates from scratch by creating site based on team or blank site template and activate features as needed. Also, word of caution – Never change out of the box site definition. 
27.  Deployment discipline – During the deployment and retraction process while updating or upgrading custom solutions, please use the correct older version of WSPs to retract the solution before deploying or upgrading the custom code with newer version of WSPs. This would ensure activating or deactivating features reference correct version of WSPs. 
28.  Although the CSOM, the REST interface, and the SharePoint ASP.NET Web services are all available when you develop server-side code, the use of these APIs in server-side code is only recommended for accessing data from another farm. Using the server-side object model is more efficient than using any of the client-side APIs.
   

Hope it will be helpful.
Configuring the User Profile Service in SharePoint 2010

Introduction:
User profiles provide detailed information about individuals in your organization. A user profile organizes and displays all the properties as well as documents and other items that are related to each user. In order to effectively use User Profile Services in SharePoint 2010, it should be properly configured.

Solution:
To configure the User Profile Service, complete the following steps to use User Profile features.

I. Configure the Managed Metadata Service
II. Create User Profile Service Application
III. Configure User Profile Service
IV. Configure the Synchronization Connections
V. Configuring a Synchronization Timer Job
VI. Manage User Profile/Properties after completing above configurations

I. Managing Metadata Service

The User Profile service requires that the Managed Metadata Service is setup and configured first. The Managed Metadata service allows you to utilize managed metadata and provides you with the ability to share content types across sites.
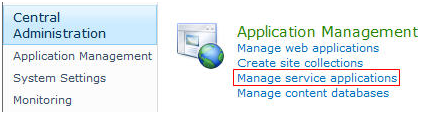
1. To configure the Secure Store Service, go to:
CA -> Application Management -> Manage service applications.
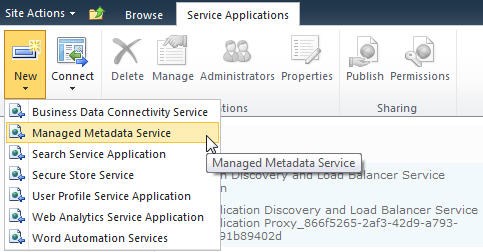
2. Click New and select “Managed Metadata Service.”
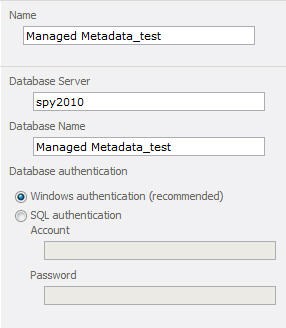
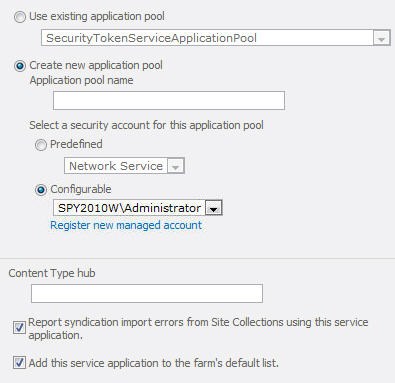
3. Enter the corresponding information for each field (Name, Database Server, Database Name, Application Pool Identity, etc.), then click the “Create” button.
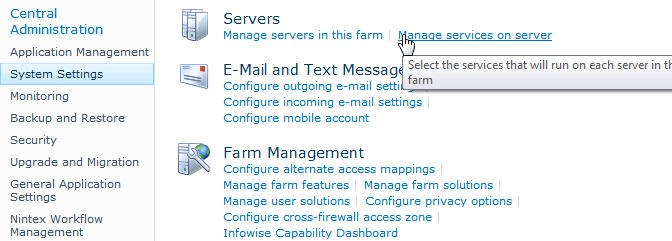
4. Lastly, enter CA > System Settings > Manage services on server and start the Managed Metadata Web Service.
5. So, the first step is completed. The next step is to configure User Profile Services on server.

II. Creating a User Profile Service

User Profile Services is the service that all UPS requests pass through.
1. To start with the second step, enter:
CA -> System Settings -> Manage services on server.
2. Scroll down and find “User Profile Service“.
3. Make sure the status of the service is displayed as “Started.” If it is stopped, then start it.
4. Starting the service will activate the service, which is a requirement prior to creating the service application.
5. To create and configure the User Profile service application, re-enter:
CA -> Application Management -> Manage service applications.
6. By default, every web application takes the default service application, but for our purpose we need to create a new User Profile service application.
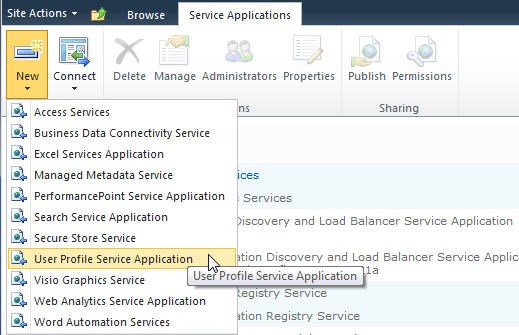
7. On the ribbon, click on the Arrow below “New” and select “User Profile Service Application.”
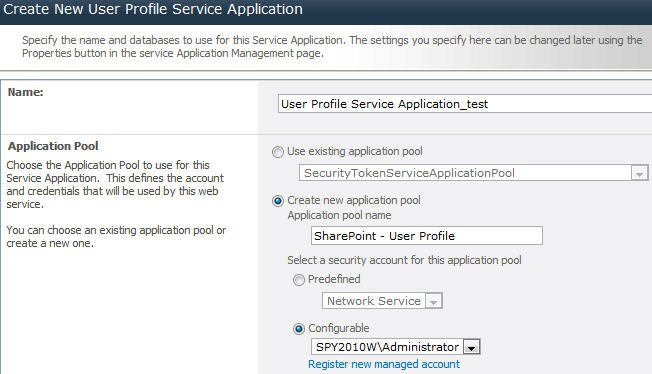
8. Enter an appropriate application name.
9. In the “Application Pool” area, we can create a new application pool or choose an existing one.
10. For our purposes, we will create a new application and configure it with an appropriate security account.
11. We need to make sure the service account has sufficient rights on all data sources as well as network sources.
12. After filling in all details, click the “Create” button
13. Specify the Profile Database, the Synchronization Database, the Social Tagging Database, and the corresponding Profile Synchronization Instance Server.
14. Then click the “Create” button.

III. Configuring Synchronization Service

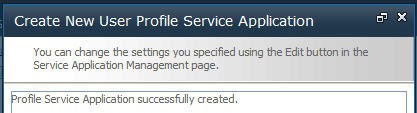
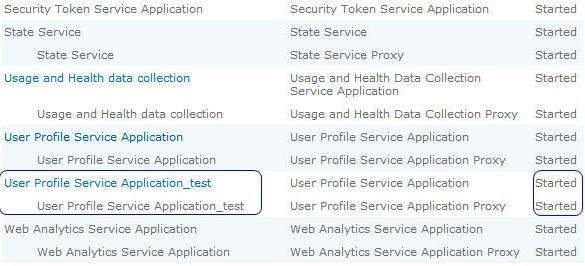
1. A User Profile service application will be created, which is “User Profile Service Application_test.”
2. We can see the status of above service is Started.
3. Goto CA -> System Settings -> Manage services on server.
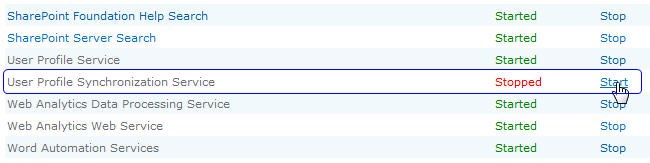
4. Scroll down and find “User Profile Synchronization Service“.
5. Make sure the status of the service is displayed as “Started.” If it is stopped, then start it.
6. Starting the service will activate the service, which is a requirement prior to creating the service application.
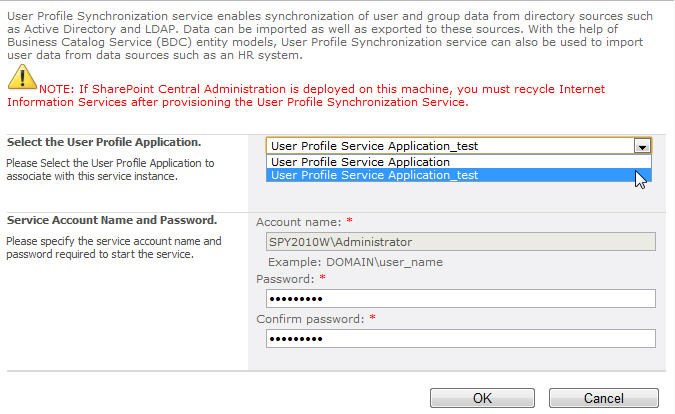
7. Select “User Profile Service Application_test” as the User Profile Application and input the valid password of account, then click the “OK” button.
8. Before configuring the User Profile Service, we have to make sure the Forefront Identity Manager Services (FIM) are correctly configured and started in the Local System Services.

IV. Configure the Synchronization Connections.

1. Configure the User Profile Connection by going to:
CA -> Application Management -> Manage service applications.
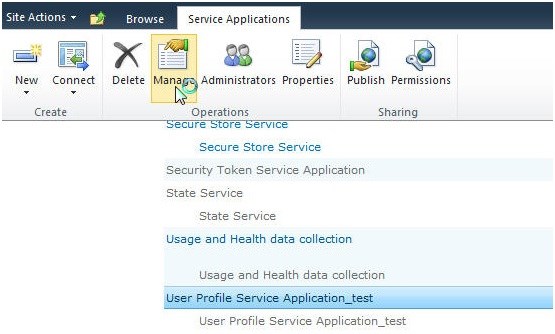
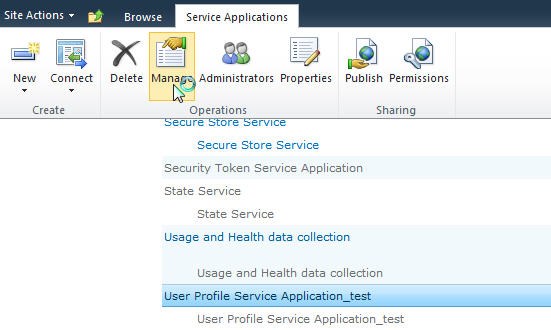
2. Select “User Profile Service Application_test” user profile and click “Manage” on the ribbon menu.
3. There will be multiple sections related to User Profile.
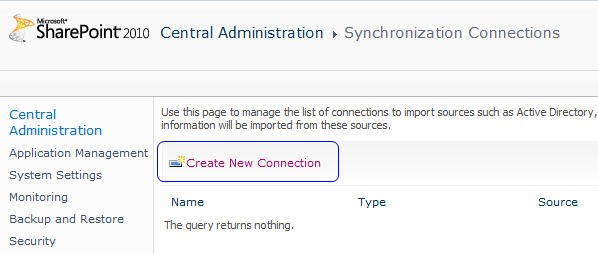
4. For our purposes, click on “Configure Synchronization Connections.”
5. Click “Create New Connection.”
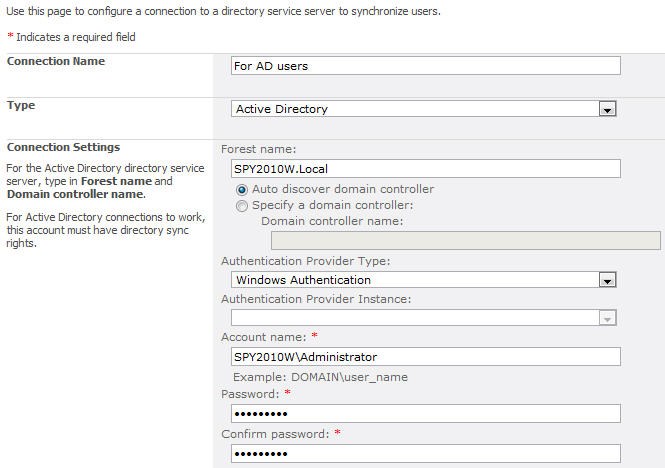
6. Enter valid values for the various fields Connection NameTypeAuthentication Provider TypeAccount Name and Password.
7. Set the port with default value 389.
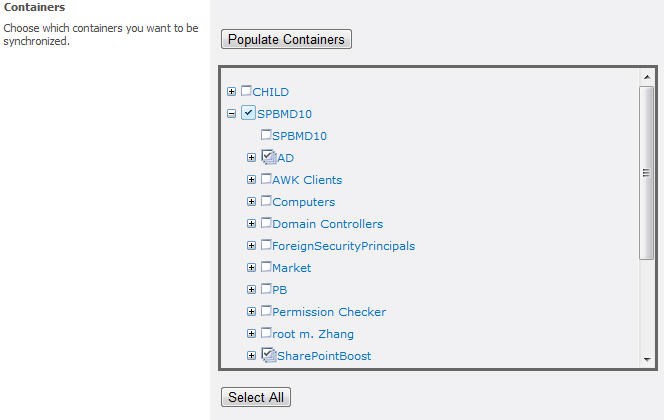
8. Click on “Populate Containers” and select several OU in Active Directory (the selected containers will be treated as synchronized object), then click the “OK” button.
9. The Synchronization connection has been successfully created.
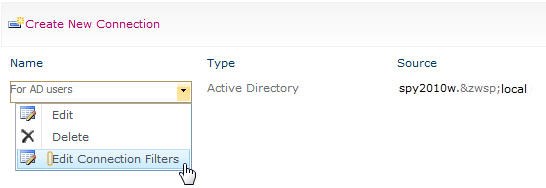
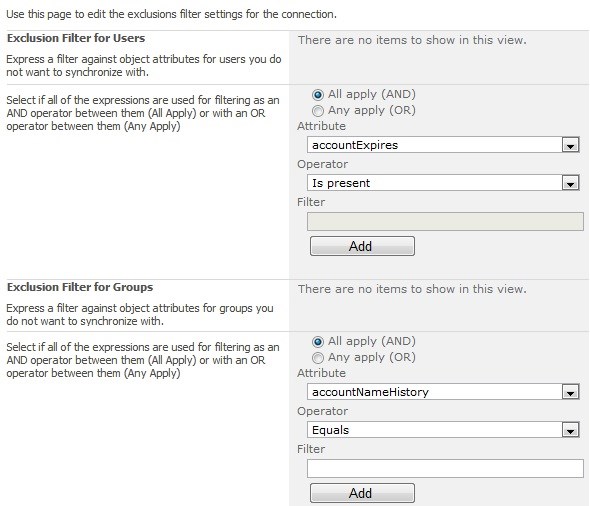
10. We can now easily setup connection filters against our Active Directory User Profile connection by clicking on the connection that was just created and selecting “Edit Connection Filters.”
11. Specify and add any User or Group exclusions and then click OK.
12. Complete above steps, we will configure a Synchronization Timer Job.

V. Configuring a Synchronization Timer Job

1. Enter CA -> Application Management -> Manage service applications.
2. Select “User Profile Service Application_test” user profile and click “Manage” on the ribbon menu.
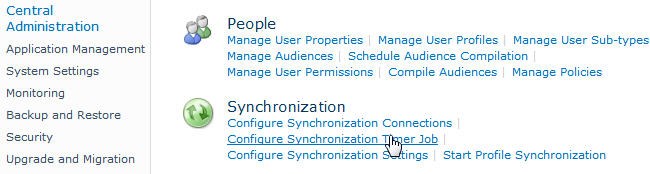
3. Click “Configure Synchronization Timer Job.”
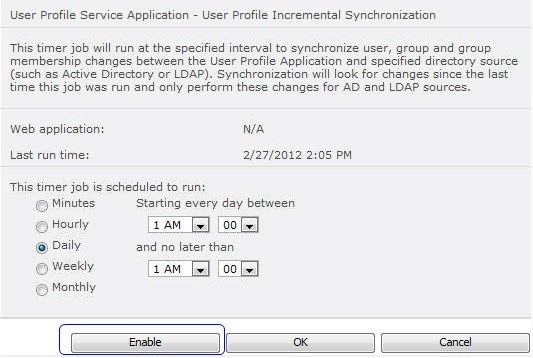
4. Enable the timer job and then start profile synchronization.
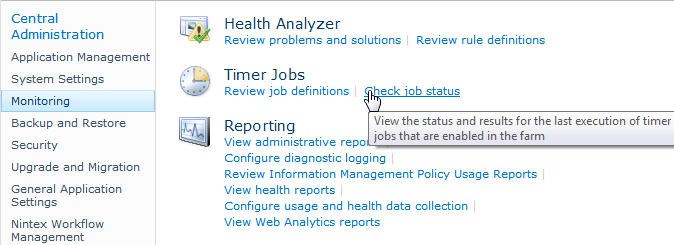
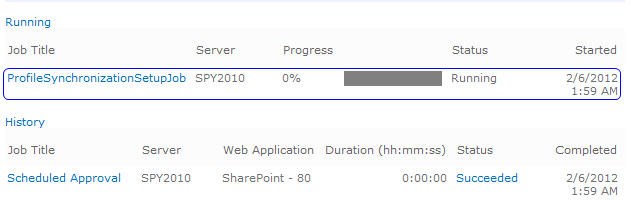
5. Enter CA -> Monitoring -> Check job status to see the profile synchronization status.

VI. Manage User Profile/Properties

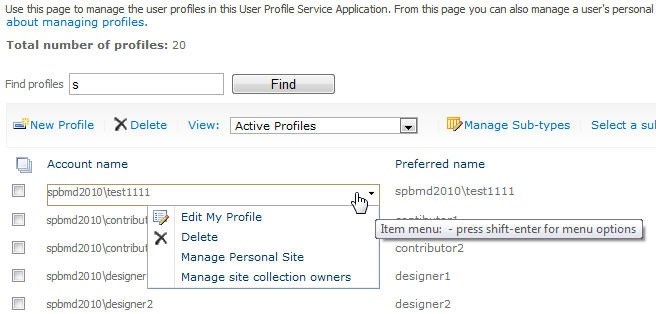
1. Finally, enter into Manage User Profiles and search for users – user information does not display by default, so you need to search them.
2. We also can add, edit, or delete user profiles to ensure that all the necessary Active Directory attributes were successfully imported.
We have now successfully completed a User Profile Synchronization!

Thursday, January 3, 2013

Using Session State in SharePoint 2010

SharePoint 2010 uses two services related to session state that have similar names but are separate and have different purposes.
  1. ASP.NET session state may be used on SharePoint 2010 pages. This service is automatically disabled in normal installations of SharePoint 2010; it may be enabled using the instructions below. Once enabled, it appears on the Service Applications page as “SharePoint Server ASP.NET Session State Service.”
  2. The State Service service application is designed for and only available to Office internal components such as InfoPath Forms Services and Visio Services. This service is automatically enabled in typical installations of SharePoint 2010 and is not related to ASP.NET session state. It appears on the Service Applications page as “State Service.”
To enable ASP.NET session state:
  1. Enter the following PowerShell command in the SharePoint 2010 Management Shell window:
    Enable-SPSessionStateService –DefaultProvision
  2. On each web application for which you want to use session state, edit the web.config file and set the enableSessionState property of the pages element as follows:
Guidelines for using SharePoint Server ASP.NET Session State:
  1. This session state may be used by custom code in web parts and other page-hosted controls.
  2. Session state information is stored in a configurable SQL database; this implies the following:
    1. Load-balancer affinity is not required.
    2. Heavy use of session state must be included in database/capacity planning. By default, the session state database is created on the same database server hosting the SharePoint 2010 farm configuration database. This can be changed to place it on another server; this can be done at a later date if necessary. To move it to another SQL server, it should first be disabled, then enabled again with different configuration that points to the other server.
  3. When enabled, Session state is available to the whole 2010 farm. Each web application can choose to enable it for use on ASP.NET pages (enableSessionState="true").
  4. Session state is partitioned using the root URL. This means that different web applications will have different session state objects; a web part can only access the session state object available to it. If host header site collections are used, then different session objects will be used for each site collection (the browser will have multiple session ids in different cookies).
The Enable-SPSessionStateService cmdlet creates a session state database, installs the ASP.NET session state schema, and updates the Web.config files on the farm to turn on the session state service.

use Get-Help Enable-SPSessionStateService –full for more information.

If the DefaultProvision form of the command is used, all default settings are used. These are:

  • DatabaseName = “SessionStateService_
  • DatabaseServer = the same database server as the SharePoint 2010 configuration database
  • DatabaseCredentials = Integrated Windows Authentication

If the DatabaseName form of the command is used, then these parameters may be set explicitly. If some of the parameters are not included, they default as above. To set specific credentials for accessing the session state database, note that this allows you to specify a SQL Authentication credential only, not a Windows credential. Then, use the Get-Credential command to create a PSCredential object from a username and password, then use that object as the argument of the DatabaseCredentials parameter.

After this service is enabled, “SharePoint Server ASP.NET Session State Service” will appear on the Service Applications management page.

Tuesday, December 6, 2011

Avoid checked out issue while drag and drop multiple documents using Explorer View

When multiple files are dragged and dropped into SharePoint using explorer view, all files are shown as checked out in SharePoint even though check-in/check-out are not required on document library.

Solution: Enable content type at document library level and make the Title column as optional for the content type document. Then try to upload the multiple documents using explorer view. Then It will work fine as expected.

Friday, October 1, 2010

Configure Item Level Permissions for Document Libraries

Every once in a while your customer might ask you to customize permissions for a document library in such a way that authors can only change their own documents. There was no such feature for document libraries in SharePoint 2007, and the “problem” is still present in v2010. (Both versions support automatic item-level permissions OOTB for other lists like Tasks).

In this article we will examine how you can create a workflow that will customize item permissions for each document submitted to a document library (only the Author will have contribute permissions). These SharePoint Designer 2010 workflow activities can also be used in various workflow scenarios where permissions need to be revoked after an item is submitted (e.g. Annual Leave Requests, various approvals etc.).

Here is what you need to do:
- Create a new Document Library (e.g. Top Secret Documents)

- Go to Document Library Settings > Permissions for this document library

- Click on the Stop Inheriting Permissions command from the ribbon

- Revoke permissions for all but a few important groups (e.g. Portal Owners and Portal Members).
Please note: Steps 2. – 4- are optional but the workflow is going to be much simpler if there are fewer permissions to manage

- Open your site in SharePoint Designer, and select theWorkflows option and your list from the ribbon

- Type the name for the new workflow (e.g. Customize Permissions)
Insert a new Impersonation Step. This special step runs each activity as workflow author.

- Make sure the workflow author (you) has proper privileges to manage permissions for this list.

- From the list of workflow actions choose “Replace Item Permissions

- Click Replace these permissions

- In the dialog click Add

- In the Choose permission to grant dialog click Contribute, and then click the Choose… button

- Add User who created current item to the Selected users list

- Click the workflow name (e.g. “Customize Permissions”) to manage workflow settings

- Make sure you have selected the correct Start options

- Publish your workflow

Once a user adds a document to a document library this workflow will revoke permission from other users and grant contribute permissions to the document author.

Friday, September 24, 2010

Vision and Reality of SharePoint 2010

The Six Pillars of SharePoint, New and Old

Microsoft has released several generations of SharePoint, but you only need to be concerned with SharePoint 2007, which has been around for roughly 3 years now, and SharePoint 2010, which was officially released in May 2010.

In the pie diagrams below you see that Microsoft divided both SharePoint 2007 and 2010 into 6 different core functional areas, and that these core concepts have evolved from the 2007 to the 2010 version.


SharePoint 2010: An Ambitious Enterprise Platform

1. Sites: Building and Managing Internal and External Websites

The 2010 release does bring a number of WCM improvements:

- A more intuitive content authoring/editing experience, with a similar look and
feel to MS Office
- Better support for websites that need to be available in multiple languages
- Better organizing and categorizing of content
- Compliance with Web Standards like XHTML and WCAG 2.0 AA to ensure a wider range
of users and devices can view your website
- Improved search, particularly via FAST Search, including more relevant results and
more ways to view the results
- Integration of Web Analytics to see how your website is performing
- Personalization via Audience targeting
- Cross browser Support — view your site on most of the popular browsers today

2. Communities: Creating a Social Collaboration Environment

SharePoint 2010 works towards this goal by supporting:

- The ability to create detailed user profiles (think employee Facebook pages)
- Use of modern tools for sharing and collaboration including blogs, wikis, RSS feeds and activity streams
- The creation of special interest groups (Communities) to share knowledge or work on projects (these often map directly to your company's org chart)
- Interactivity and engagement via commenting and discussions around content items, and social tagging/bookmarking of content
- The creation of separate personal spaces or dashboards called MySites where you can keep track of your own content, and the work you are doing in certain communities, projects and more

3. Content: Managing Your Documents, Information and Records

SharePoint 2010 provides the tools to help you work with both:

- Manage all of your organization's documents and other information including controlling who can read and update them
- Categorize them for easier search and retrieval
- Mark them as official records and lock them down from further changes


4. Search: The Google for Your Organization's Private Info

SharePoint 2010 has two levels of search: the built in functionality which is greatly improved from SharePoint 2007 and FAST Search, offering additional functionality. Out of the box SharePoint search includes the ability to:

- Search for information and people, including particular expertise
- Index content and data stored outside of your SharePoint database
- Use your Windows 7 desktop search to find information within SharePoint
- Refine search results based on taxonomy and metadata (how content is organized and classified)

The addition of FAST Search brings enhancements, including:

- View thumbnails and previews of content within the result set
- Refine results based on user profile or audience
- The ability to refine search results with filters like Site, Author, Result Type and more


5. Insights: Digging for Business Intelligence

key goal in any business is staying ahead of the competition. Increasingly, the class of software called Business Intelligence plays an important role here. Business intelligence software is all about helping you make decisions and find problems.

There was a time when you needed a special role in your organization for someone to do all this data gathering and analysis. But times have changed and SharePoint 2010 provides a number of tools that put this capability in the hands of the average employee.

With this release you can:

- Use tools like Excel to gather and analyze data that is stored in SharePoint
- Use SharePoint's native Excel Services engine to crunch data and build web-based reports
- Pull together information from different systems and present it in SharePoint
- Create dashboards, scorecards, and other views — making key performance indicators widely accessible to information workers and process managers

6. Composites: Integrating Your Business Systems

Another big improvement for SharePoint 2010 relates to its ability talk to — pushing and pulling data — your other business systems. Instead of having to work in multiple systems, you can create composite applications — mashups, if you like that term — on the SharePoint platform that pull together various data and content from different systems, including SharePoint content, to provide a single location for an employee to work.

Data integrations are key for management dashboards and project management, but also for employees who may not need full access to the business application. It's important to note that SharePoint 2010 can both view and update external data via its Business Connectivity Services (BCS).

Saturday, September 4, 2010

Business Connectivity Services (BCS) in SharePoint 2010

Business Connectivity Services (BCS) are the upgraded version of Business Data Catalog from SharePoint Server 2007. BCS allow you to connect your SharePoint based content with external data (often called LOB Data – Line Of Business Data). With this powerful functionality you can read the data from external sources and edit them directly from SharePoint sites or web parts. BCS is also fully integrated with the Office 2010.

The standout feature of BCS is the SharePoint Search capability – now you can take your relational databases with plain unformatted data and present them in a SharePoint farm using powerful Search capabilities, social tagging and all the new features that ship with SharePoint 2010. There is also one very important improvement since 2007 – BCS is available even in the free version of SharePoint Foundation 2010, previously it was not available in WSS 3.0.

In this article I will discuss the overall BCS model and demonstrate the configuration of a connection with BCS in a SharePoint Server 2010 farm.

Business Connectivity Services (BCS) Administration

BCS Services are administered using the Business Data Connectivity Service (BDC). If the BDC shortcut is familiar to you from SharePoint 2007, you should note that BDC no longer means “Business Data Catalog”. BDC is now the service that lets you manage BCS services configuration.

Using the BDC, you can manage external content types (sets of fields from other business applications), external systems (such as SQL Server databases, third party applications, etc) and BDC models (in XML format).

Business Connectivity Services supports two types of XML definitions (similar to those from BDC in SharePoint 2007) – application models and resource files. Application models contains the XML definitions of the external content types. Resource files describe imported or exported properties, permissions or localized names.

If you are familiar with the previous BDC model, you may expect that to setup BCS you will need to create complex XML definitions using Visual Studio. Of course, you still can, but now there is simpler way, since SharePoint Designer 2010 let you do the job with only few mouse clicks.

Before we actually start some configuration, we will quickly examine BCS’s functionality and overall model.

External Data Sources

Business Connectivity Services can connect to the following types of external data:

- SQL Server Databases
- SAP Applications
- Web Services – including Windows Communication Foundation (WCF) Web Services
- SharePoint based web sites
- Third party applications

Business Connectivity Services Architecture:

- BDC Service – stores and secures external content types.
- Secure Store Service – securely stores credentials for external systems and manages the associations with the internal/SharePoint based identities.
- BDC Server Runtime – uses the BDC data on front-end SharePoint servers to access/execute operations on the external systems for web browsers and other thin clients.
- BDC Client Runtime – uses the BCS Service and Secure Store Service to access/execute BCS operations on external systems from within the client environment.
- Metadata Cache – provides caching of the BCS Service data. The cache can be optionally encrypted.

BCS Configuration Walkthrough

In the following scenario, I will connect the BDC service to a SQL Server Database that I created. To follow this walkthrough, you will need:

- SQL Server Management Studio (to view the tables and to set the database security for BDC).
- SharePoint Designer 2010 (to configure the BCS connections).
- SharePoint Server 2010 fully operational.

First, let’s take a look at the example database in SQL Server. I created table Clients in the exampledb database, which now contains some data that I want to show within SharePoint sites.


Clients Table that will be used as the external source

Launch SharePoint Designer 2010 and open the SharePoint site (which is http://sps2010 in this example).


SharePoint Designer 2010 with the intranet site opened ( http://sps2010 ).

Click the External Content Types option in the navigation pane.


Navigation Pane with “External Content Types” option selected

In the new tab that opens, click on the External Content Type icon. This will create the new External Content Type that we will use to connect with our SQL Server database.


BCS Ribbon in the SharePoint Designer

Click on the Name field and modify the Content type name and Display Name. I have called it My Clients since it will connect with the client list.


SharePoint Designer 2010 External Content Type configuration window

Now, to create external connection and define the operations for the BDC service, click on the blue link on the bottom of the ECT configuration window (Click here to discover external data sources and define operations).

Click the Add Connection button and specify the Data Source Type (in our scenario it will be SQL Server).


External Data Source Selection

Next, you need to provide the actual SQL Server connection details in the below window.


SQL Server Connection settings

Now the SharePoint Designer will validate the connection and you will be shown the results.


SharePoint Designer 2010 connected to the External Content Type – SQL Database

Next, right click on the clients table and select the Create All Operations option from the menu. This operation will launch the Wizard that for creating all the required operations. In our case, we will have create, read, update, delete and query data operations for our external connection source.


SQL "Clients" table menu in SharePoint Designer 2010


Parameters Configuration wizard within the SharePoint Designer 2010

In this demonstration we will accept the default settings, which will actually get all the table information (which is fine since we don’t have lot of data ). The only one step we need to do is to specify the identifier. This is the unique table column that will be different for every field in the database. In our case, the unique identifier will be the Company name, so we only have to check the box next to the Map to Identifier and click the Next button on the bottom.

On the next wizard screen, click Finish. If your configuration was successful, you should see the information in the External Content type window as in the screenshot below.


External Content Type status

Now from the SharePoint Designer ribbon, select Create Lists & Form icon to create our list that will be using the external connection.

External Content Types ribbon in SharePoint Designer

Next we need to specify the List name, read item operation, system instance and List description (optional).


Create new BCS List window

That’s it! Our list is ready and is already deployed on the SharePoint site. Now let’s take a look at the result directly on the SharePoint site.


SQL Database viewed within the SharePoint list using Business Connectivity Services

Note that you can actually edit, delete and create new table fields within the external database and you don’t have to use a single line of code. All you need is the SharePoint Designer and a few mouse clicks.


Adding new item to the database from within the SharePoint site